Showing posts with label tutorial. Show all posts

Wednesday, August 7, 2013

Bride bookmark and Solomon's Knot tutorial

It has been a while but with vacations and some home repairs, I haven't been able to work on the computer much.  Luckily, it doesn't mean I haven't been designing.  I love knit or crochet because I can take with me.

I am currently designing a bride bookmark.  This is part of a commission wall hanging.  I love how she came out.
 
I decided to give her an overskirt on her dress of Solomon's knot or Love knot lace because of its fantastically lacey look.  So I thought I would do a picture tuturial of this particular stitch.
 
To start,  pull up a loop.  My pattern calls for a loop that is 1/4 inch long.  (Most patterns will tell you how long a loop is required for their pattern.)  
 
Yarn over and pull a loop through.
 
  Now comes the "tricky" part.  Sc in back strand of the long lp created by pulling a loop through above.
 
Below is a completed Solomon's knot or Love knot.


 Generally, a pattern has you make several on top of  each other as shown below. 
Future rows are generally worked in the sc stitch on top of the knot.  The stitch is not a hard one just a little confusing if you have not run into it before.
Here is a back view of the overskirt to show how neat this stitch works up.
I love how it came out. 
I think crochet and knitting are wonderful.  They are so mobile that they can be taken on 16 hour drives to see the children and the work isn't put on hold until we return.  What do you like about these arts?


Thursday, December 13, 2012

changing colors in crochet

With all the joyous activity that surrounds Christmas, I have not blogged as often.  I am currently designing a nativity wall hanging which will be ready next year as there is not way it will be finished this year yet.

I am using a striped pattern for baby Jesus and I realize that a tuturial on different methods of changing colors might be helpful.  Here is a picture of the baby Jesus.
 

As the picture shows, every other row on the body is a different color.  I will show the way to change colors in the round without cutting the thread and adding knots to the work.

Using the last stitch of the row, in this case a slip stitch, pull the new color up from behind the work to make the first loop of the new row.
 
Pull the loop through and start the next round using your new color.  (In this case you go from gold to white)
 
 
This can be done also if you are working on an item that is worked in rows.  In this case, at the end of the row, make a ch of 1, 2, 3 or 4 if the next row is sc, hdc, dc or tr.  Drop the old color.  (I usually pull up a large loop so that it won't unravel as I work on the next row.) 

Insert you hook in the next row's color loop, turning work to work across the row in a new color.  Again, when done with that color, add a chain stitch long enough to get past the next row and switch to the new color.
 
Here is another switch, using the next color.

 
To break off the color, the best way I have found to hide the ends and not have a lot of knots is to lay the broken off color along the top of the row and crochet around it as you work the next row.  This way you don't have loose ends at the end of your piece that has to be woven in.
 
 
I love color work.  It helps to bring out the design of a piece and just add that something extra.  Learning some of these little tricks has made the process so much easier. 
 
I hope you are having a wonderful Christmas Season.  Do you know of any other other nifty tricks for working with color on crochet?


Friday, February 10, 2012

Making Nupps

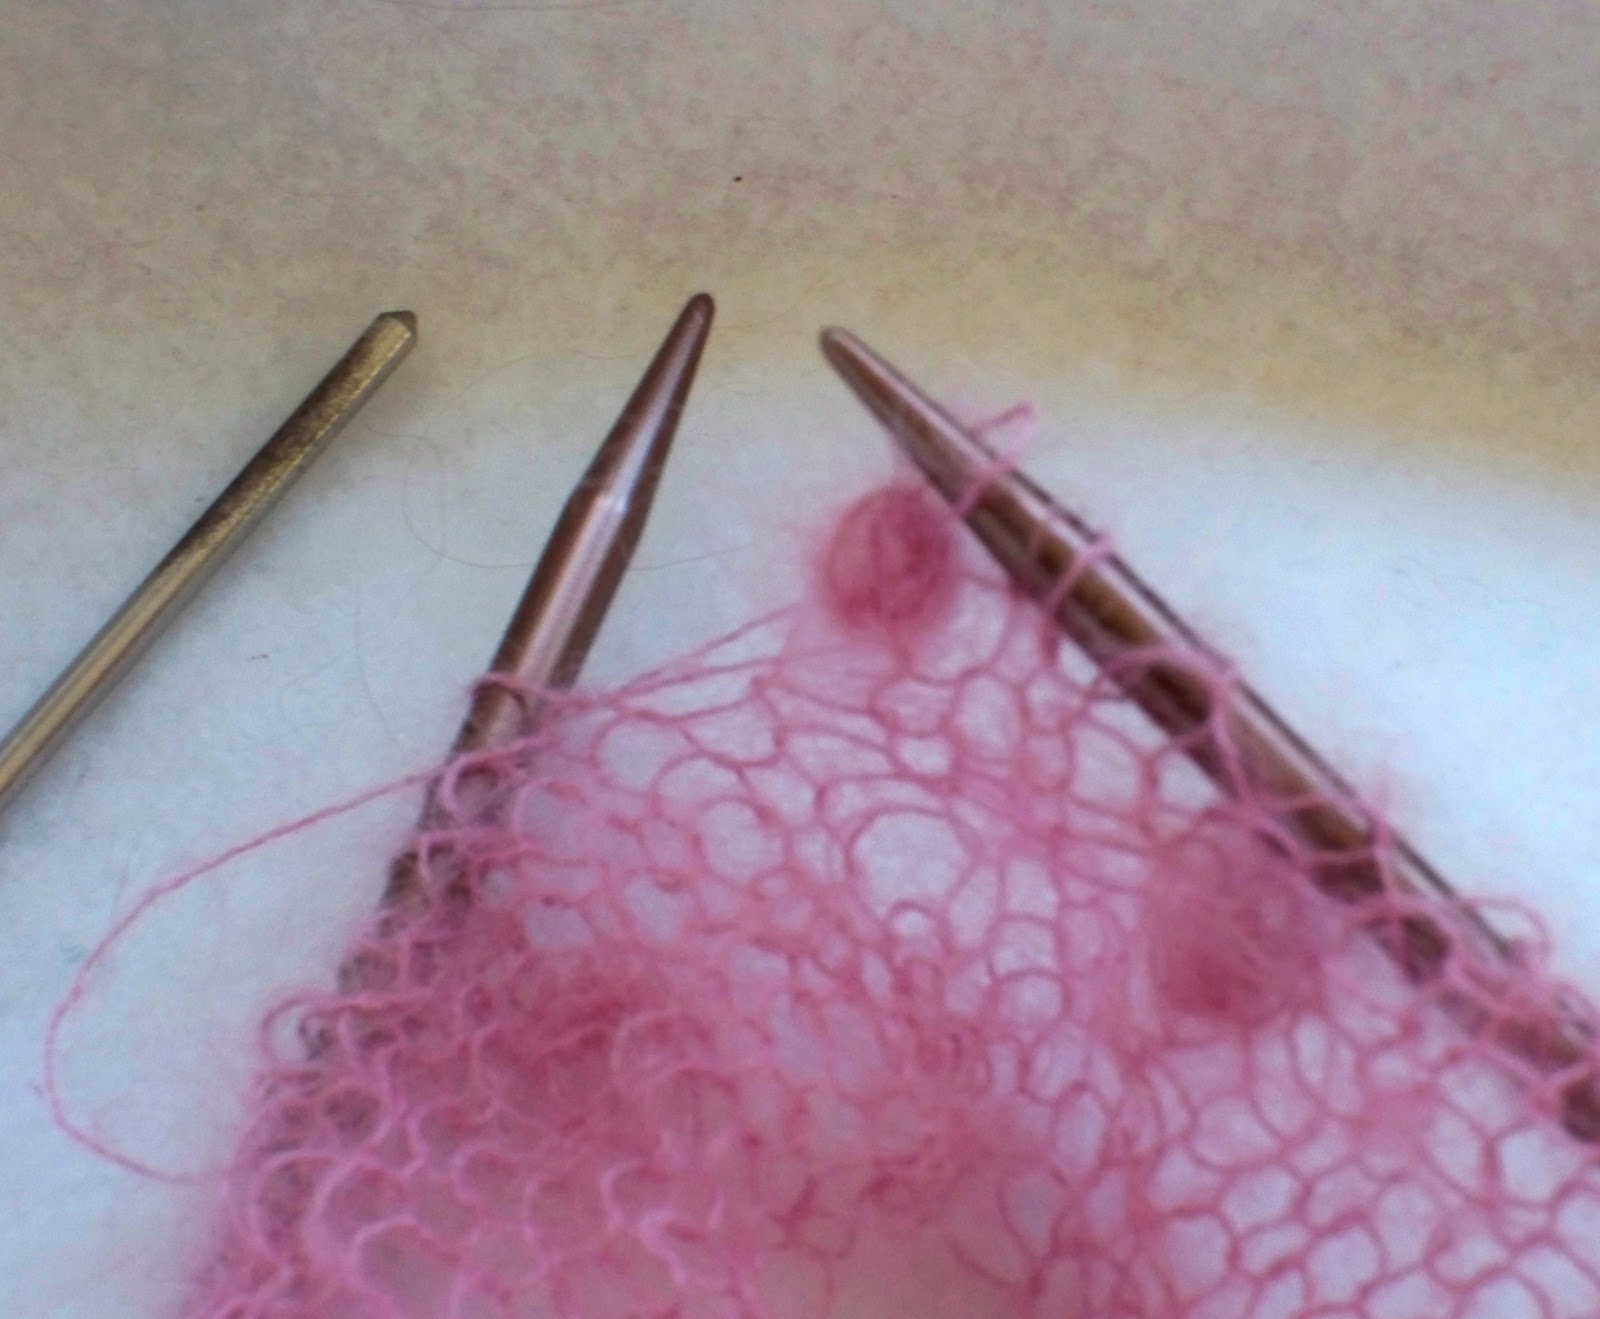
I love 3 dimensional crochet.  I also love to knit especially when the weather is cold outside.  A few year's ago I disovered nupps in knitting and designed a heart wrap for Valentine's season.  These little "bobbles" in knitting add an extra dimension to the work but can be a real challenge.  Here is the easiest way I found to make these little jewels.


Nupps are made using two rows. On the first row (the knit row on a stockinette stitch) where a nupp is located is simply made doing a (knit, yarn over, knit, yarn over, knit, yarn over, knit) all in one stitch. The first and last stich is always a knit stich. They need to be as loosely made as possible, by pulling the yarn up.


In thicker yarn nupps usually are made by adding 5 to 7 extra stitches in this one stitch.  In really fine yarn they are usually made with 7 to 9 extra stitches in one stitch.  The pattern will usually tell you how many extra stitches to add.  Because this yarn is so fine, this pattern calls for 9 stitches in the one stitch.


The rest of the row is worked and the work is turned over for the second row.  (In a stockinette stitch, this is a purl row.)  In the second row all these extra stitches are purled together as one.   This is the hardest part of nupps and I found a great trick to making these.  Purl on the row until you come to the extra stitches.  Find a crochet hook that will work with your yarn.  Put all the nupp stitches on the crochet hook.


Yarn over with your working yarn and pull it through all these stitches.


Finally, place this one stitches back on your right hand needle and work across the rest of the row.


The other thing I learned to watch for on the purl row is to be careful not to purl the first few stitches of the nupp into the row as this will cause your stitch count to be off.  Using this method really made nupps a whole lot easier for me.  I really like the end result of that extra dimension to the design.

I hope everyone has a wonderful Valentine's day.


Wednesday, August 17, 2011

Making Rope or the Z-twist

I am currently working on a couple of projects at once which means that I am getting a lot done very slowly.  One of the patterns I am working on is a crochet reading character bookmark of the Scarecrow of Oz.  In looking at pictures I see that he is tied together using rope at various points.  I was trying to figure out how to make crochet stitches look like rope.  Then my dear husband reminded me of a pattern I did in my youth that had a rope looking part to it. 

I thought I would do a pictorial tutorial on how to make the appearance of rope.  Spinners will recognize this as the Z-twist.  It can be used with yarn, string, thread or any material of sufficient length.  I have even used this with dried Yucca leaves to make rope just as Native Americans did years ago.  In spinning it is called plying and it involves spinning several bobbins going one direction.  Then to ply the single thread created on each bobbin into a 2 ply or 3 ply yarn, the single thread bobbins are spun together on a separate bobbin going the opposite direction from the way the single threads were spun.  This locks them into place and give the yarn much more strength.

I took a long piece of crochet thread and doubled it.
This can be done with yarn for the same results.  Next step is to twist it tightly.
Now I knot both ends without losing the twist in order to keep the twist in the work.
Now comes the z-twist part.  I double the thread which causes the twists on both threads to want to lock into place.  I kept both threads apart until they were even length and then allowed them to lock together.

I then twist them together a little more if needed and tie both ends to keep these twists in place.
Some of my "rope" needed to be thicker than other ropes on the piece, so I just doubled the thread again.  
Twisted a little more and knotted both ends to hold in place.  Now I have the "rope"  that is needed to make my scarecrow.  I have used this technique with yarn also and it produces the same great results.
I am hoping to have this pattern off to my pattern testers by the end of the week.


Monday, July 11, 2011

Making Patterns

It has been a while but that is summer time for you.  I was asked recently what it took to make a pattern so I thought I would write about it.  It is a really long process but well worth the effort when it come out just the way I want it to.

Obviously, the first step is an idea.  I then do a search for other patterns in knit or crochet that might have the same idea.  It is amazing how many times I think I have thought of something truly unusual and find that someone else has already got the same idea.  Both knitting and crochet have been around long enough that it is really hard to find something that hasn't been done.  I do not want to infringe on someone else's copyright.

O.K.  Now I have an idea for something that I haven't seen before and can't find a pattern for.  First since I make a lot of characters, I look up to see who holds the copyright for those characters.  If no one does, and they are in the public domain I can now continue.  I do an image search for that character and get a lot of different looks.  Again, I do not want to copy one of these images as they are images that other artists have the rights to.  I try to decide what elements the character needs to be recognizable as that character and come up with my own look.

Now the real work begins.  Taking the yarn or thread colors that I need, I start making the character or item.  When I am planning on using really nice yarn, I usually do this part in scrape yarn as I know that I will be taking it out a lot and trying something else and I don't want to ruin my good yarn doing this over and over again.  I have a notebook and I write each stitch down.  I also use the notebook to make drawings of what I would like the piece to come out as.  As I take out different sections, I scribble out what I had originally put down and add the new way of making it to come out the way I want it. 

I use a lot of stitch dictionaries that I have in my collection of crochet and knit patterns.  Another resource I find invaluable to finding stitches is YouTube videos of different stitches.  I have read how to make different stitches but find I can understand it so much easier when I see it.  Here is one of my favorite videos on Kitchener Stitch which is really confusing when it comes to reading how to make this wonderful seamless seam.  Kitchener Stitch Video

It usually takes 2 or 3 weeks to come up with a pattern that I am happy with.  Now I go to my computer and type all those stitches that I  have written in my pattern notebook.  This can be a real challenge to read over all the cross out sections and put them into a document.  I try to format the pattern to way I would find it the easiest for me to read.  I space between each row with the row and number in bold letters so that it is easy for your eye to find the row that is being worked on.

If any section is unusual I try to take a picture of that stitch or section so that the reader can see what I mean.  Here is a picture of a puffed sleeve I make on some of my character bookmarks.  Now I print the document and make a second item using the document that I have created.  If I am using nice yarn this second one is done with the good yarn.  The second and often third time through, I am looking for mistakes that have been typed in.  There are always a lot along the way.

On the second time through I measure the yarn or string that I use to make the piece along with the name of the color.  It am trying to keep my patterns in line with the industry standards as found at this website http://www.craftyarncouncil.com/standards.html  Here is an example from one of my patterns.

Materials: bedspread weight cotton threads (size 10)
33 yards burgundy (or choice of main bud color)
27 yards dusty rose (or choice of contrasting bud color)
4 yards Kerry green (or choice of stem color)
67 yards White (background color)
Boye Steel Crochet hook size 1 (2.25mm) 
Gauge:  8 hdc = 1 inch (2.5cm), 5 hdc rows = 1 inch (2.5cm)
Skill Level:  Intermediate

Finished Size:  10 inches (25.5cm) round diameter
Stitches and Abbreviations used:  again I use the yarn council's standards abbreviations.
When the pattern is "correct"  I send it off to at least 2 other pattern testers.  These wonderful people will make the pattern for me, looking for corrections and offering suggestions on how to make the pattern easier to understand.  I give them a deadline so that I will get it corrected in a timely matter.
When I receive it back from these wonderful people, I am ready to publish my pattern.  It usually takes close to a about 45 to 60 days to get a pattern ready to be published.  It is a time consuming process but I love sharing my patterns with others.
Is making patterns something you would be interested in doing?  If you have the time and patience I would encourage anyone to try.  I want to see the art of crochet and knitting continuing to grow with new ideas and designs.


Saturday, April 30, 2011

May is Here

Spring is in the air in Kansas and tomorrow is May Day.  As a child I made May Baskets, (usually out of construction paper or old wrapping paper) filled them with flowering blooms and gave them to my grandmother who lived near us.  Of course she was thrilled.  When my children came home with May Baskets from school, they put little posies in them and gave them to our elderly next door neighbors.  (Their grandmas lived 500 miles away.)  The neighbors loved them.  What a neat tradition to let the elderly know they are still appreciated.

May basket are very easy to make.  My favorite designer, Elizabeth Ann White, has a free tutorial and pattern for making a very quick and easy may basket.
http://bellacrochet.blogspot.com/2009/04/grannys-may-day-basket.html
This is a very simple pattern and would work up rather quickly.  Her tutorial will guide you right through the process.  Who wouldn't love such a surprising and sweet gift.  It can be filled with flowers, soaps, dried flower arrangements or little treats to be hung on the door knob.  (My kids always rang the doorbell so that the neighbor knew there was a gift just for them)


Ann has so many wonderful patterns on her website.  Having bought from her I can say they are well written with lots of helpful hints and well worth the money.  Check out her wonderful doilies, baby designs, crochet accessories and even some free patterns at: http://bellacrochet.com/

Happy May Day to all and especially to the elderly in our communities.  What would life be like without their patience, wisdom and kindness.  Do you have any plans for surprising  someone tomorrow? 


Sunday, August 8, 2010

Special Long Half Double Crochet Tutorial

One of my designs calls for a long half double crochet stitch and someone who was doing my pattern let me know that she couldn’t find a tutorial on line on how to do this stitch. So I am going to try to show how to do this stitch.


I use half double crochets a lot in my designs as they make an excellent transition from single crochet (sc) to double crochet (dc) without an apparent jump in size. They also make an extra thick sc in designs that need the bulk.

The half double crochet (hdc) is a cross between a sc and a dc. It has two wraps like the dc.


The hook is then put through the next stitch; the thread is caught from behind the working fabric and pulled through, resulting in 3 loops on the hook. Then the working thread is pulled through all three loops on the hook.


The hook is then put through the next stitch; the thread is caught from behind the working fabric and pulled through, resulting in 3 loops on the hook. Then the working thread is pulled through all three loops on the hook.

In my design of the Rose Budding Hearts Doily I use this stitch with a variation. I have named it a Special Long hdc stitch. Two buds have been made by folding a working fabric in thirds and secured by a row of sc, connected by a chain. The thread is then changed to a stem color with a sc to start the row


The next stitch is the Special Long hdc. Instead of inserting the hook in the next sc it is inserted in the first burgundy row (skipping the pink row). There are no Back Loops to work in the previous row because the stitch is poked through all three layers of fabric and worked.


This helps further secure the folded fabric in place and makes a small leaf on the front side. A second Special Long hdc stitch is then worked in the same hole as the first one.


The sc behind the special long hdc is skipped on the working row and a sc is worked in the last sc on the working row. Then a chain is made and the first sc is worked on the second bud. The next stitches are again 2 Special Long hdc.


The row is completed with a sc in the last sc on the working row. The buds are turned for the next row and you can see how the pretty little leaf looks on the buds.


I hope this tutorial has explained the Long hdc stitch and especially the difference of my Special Long hdc required to make these cute little rose buds.

Saturday, July 10, 2010

Making faces for LoisLeigh's bookmark patterns

I am currently working on a series bookmarks from fairy tales, fantasy stories and nursery rhymes. It combines two of my loves, reading and three dimensional crochet. I am using size 10 cotton crochet thread because of all the fantastic colors available with crochet threads. I use a Boyle size 1 (2.25cm) or size B. This is a larger hook then is usually used with this thread but it gives me the size piece I want and makes it easier to see the holes to.


All the heads are basically the same. They are worked in the round. The head hangs outside the book and helps the reader find their place easily.

Here are some tips that I have found for adding sculpture to crochet heads. Most sculpture crochet patterns create the sculpture with the stitches as these patterns do, but to add a little more depth and height to the sculpture there are a few things that can be done.

I am not an expert on embroidery but I know some of the basic stitches. I use simple straight stitches for the eyes as this give me the look I want, although I am sure a French knot would work for more rounded or dot eyes such as the Raggedy Ann and Andy Patterns.


For the more sculptured faces of the other bookmarks, I knot the thread and start at the back of the head where much will be covered with the placement of hair on the doll or in this case bookmark. Sending the needle through a hole between the stitches in the back of the head (opposite the eyes in the front), I pull the knot through the head to just past the stitches in the back. I do not pull it all the way through the stuffing to the front but leave it just underneath the back of the head.


I do a few straight stitches on the front over the eye holes. I try to come out at the same spot on the part of the eye closest to the nose and fan the stitch out a little bit on the outside of the eye. When I have the eye the shape I want, I add some additional depth by sending the needle all the way through the head and coming out the back. I go back through the head to the other eye hole on the face making a stitch on the back outside by going over a crochet stitch. (This stitch will be covered with hair.) I pull this stitch really tightly which pulls the front of the face at the eyes toward the back. Then I make another eye using the same method as the first eye.


Since the nose should be higher than the rest of the face, the nose needs to be built up. Using the skin color, I again make a hidden knot by going in through the back and pulling the knot through to just below the surface. Bringing the needle out the front to a point exactly in between the two eyes, I do a series of straight stitches from between the eyes down to a row above the mouth. Again, I bring the needle to the same point between the eyes and fan out the stitches at the bottom of the nose. I continue to build on top of these with straight stitches until I have a large enough nose for the face.


The lips are again simple straight stitches. I found that trying to do a smile just makes the piece look silly so I do a single straight stitch on the row below the nose and two smaller straight stitches just above this.


I hope this helps explain some of the techniques I have found in making simple faces on small crochet pieces such as the bookmarks.