Showing posts with label thread crochet. Show all posts

Monday, June 13, 2016

newest bookmark thread crochet design - daffodil Fairy

I often get asked where my ideas come from for my various bookmarks.  This one came from my garden.  I was looking through my spring garden of daffodils.  I realized that the trumpet for the flower would make a fantastic shirt and the petals would work naturally into a skirt.  I had wanted to design a fairy bookmark for a while now and I saw exactly how I could do it.


She is available pre-made at my AndersonsCreations.etsy.com.  Her head and flower can hang outside the book to remind the reader there is more story to come.  What a fantastic achievement award for anyone who loves to read.
 
One of the trickier parts of the pattern is how to make the flower petals.  Flower petals are usually worked down one side of a chain and then down the second side of the same chain.  When you start at the waist with the chain the end of the petal ends up at the opposite end of the chain then the waist.  I also needed a way for all the separate petals to be joined to each other.  I decided to use the front loop of the petal to slip stitch back to the waist.  I then worked another chain for a second petal and joined the two petals with a slip stitch in the unused back loop behind the slip stitches going down to the waist. 
 
I also needed to come up with wings.  There are so many possibilities.  I could have bought pre made wings but I wanted to make something in crochet.  I love how her wings came out using a variation of a rose leaf.
Of course I had a to design a daffodil cap to go with the curly hair underneath.  (I used Caron Simply yarn for the hair which is cropped close to the cap and unraveled which gives the hair its curl)
My pattern testers really enjoyed making this pattern which works up quickly.  One tester had never used thread to crochet with and she really loved making this.  I use a larger hook than is normally used to get the bookmarks to a "good" size and to encourage others not to be afraid to work with thread which I love working with.  My pattern for this bookmark can be found at LoisLeigh's Ravelry shop.  It is also available at AndersonsCreations.etsy.com.  If you are from Canada or the European Union I now have the pattern available at Loveknitting shop (Lovecrochet shop)  Or you can use the buy now link at the left of this post.  This button will take you to your PayPal account.
 
I really love how she came out and I am going to be designing more fairy items.  There are so many ideas running through my head with out enough time to design them all.  I add them to a list and work on my present design.  I often get requests for characters to make into bookmarks.  So many good ideas but they need to be generic so that I don't run into copyright or trademark disputes.  Nature seems to be one of my primary design inspiration.
 
What do you think of my new design?


Thursday, March 31, 2016

New crochet pillow top pattern

I have just finished a new crochet pillow pattern that features Raggedy Ann on one side and Raggedy Andy on the other side.  It took a long time to design this pattern but it was totally worth it.  My pattern testers really enjoyed making this one. 

This pattern is now available on my Ravelry store, at my lovecrochet store for  Canadian and European Union readers and in my etsy shop.  If you don't love to crochet but would like to purchase the pillow, it is available here.


The pillow is based on my Raggedy Ann bookmark.  She is made out of thread and it really a quick crochet project for anyone who loves Raggedy Ann.  The pattern is available on here on Ravelry or at my Etsy shop in the left side section called crochet patterns.  If you don't like to crochet in thread and love the bookmark, you can purchase it here


The back side of the pillow was based on my Raggedy Andy bookmark.  This thread crochet bookmark pattern is available at my Ravelry shop, at lovecrochet shop or on etsy.  Would you like this bookmark already made for you?  It is available here.

I used a spike stitch to add interest to the background of the pillow.  Spike stitches are fun and easy to make.  I used half double crochet in groups of 3 with a chain one to separate them. The middle hdc is made in the chain one space in the double crochet row below.

I used a love knot stitch to make both Raggedy Ann and Andy's hair.  All my patterns are tested by at least 2 other people and the feedback I have gotten from them is that it is a fun and well written pattern to make.  I use picture tutorials on stitches that might be new to a maker.  The pattern is rated for ambitious beginners who like would like to learn new stitches.
 
This pillow will really add a new flair to your home décor or nursery décor.  The twelve inch motifs could easily make a wonderful baby blanket for new arrivals by joining to squares together in whatever size you would want to make the baby quilt.


Pillows are such an easy and great way to freshen the home or nursery décor and work up really quickly.

Thursday, November 13, 2014

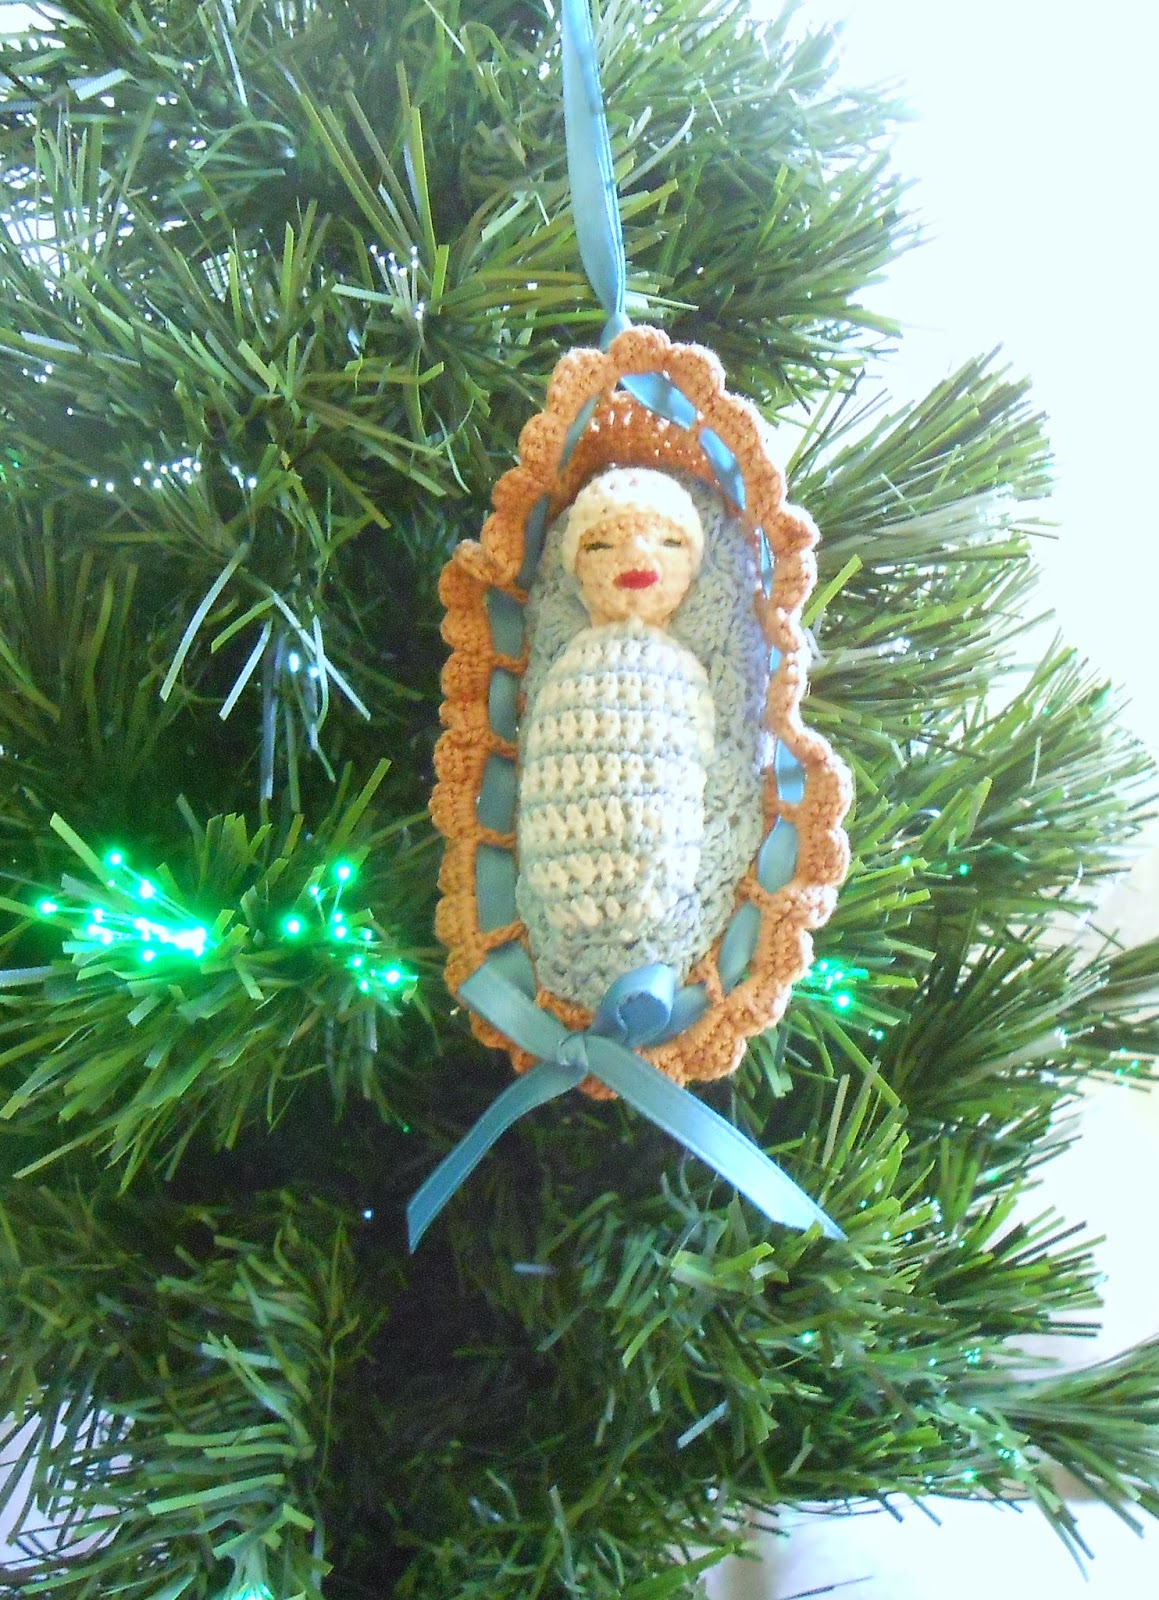
Babys first christmas ornament

There is so much to be thankful for this month.  On October 30, our new granddaughter, Ayme Elizabeth, was born.
She is so darling and so opposite her older sister, Naomi, who had no hair and is platinum blonde.  (The story of Rose Red and Snow White is what comes to mind.)  I wanted to design a pattern for her older sister when she was born. 
 
This pattern is a more advanced pattern with picture tutorials on how to make the stamens.  I wanted to design something a little simpler for our new grand baby.  Since Christmas is coming up, I thought of a Christmas ornament.  Here is Ayme's new ornament.
 
 
Once I got the pattern figured out, I decided to make one for each of the grandchildren including our grandson, Ethan.
 
This ornament has no glass for young hands to break.  The backside has a perfect spot to transfer name and date of birth onto. I will be transferring the information onto a piece of cotton material and then sewing the material onto the back.

 
The pattern is back from my pattern testers and has been checked for errors.  It is a fast and fun Christmas crochet pattern to make.  You can find the pattern here in my etsy shop. Here is the pattern in my Ravelry and Craftsy shops. 
 
Not only would this ornament be great on a Christmas tree but when the season is over, it would make a wonderful wall ornament for the nursery.
I hope everyone has a fun and wonderful holiday with lots and lots of blessings from the Lord.


Monday, October 27, 2014

Custom orders

It has been a while since I was able to blog.  We had two wonderful vacations this summer.  One to see our darling grandchildren and one to see the Colorado mountains where I get so much inspiration.  When I got back, my computer broke.  After the purchase of a new one it is finally up and running.  Then came the loss of my father in this world. (I know I will see him, again, one day.)
 One thing my father taught me is, when life gets tough, start looking at everything I can find to be thankful for.

I thought I would do a post on one of the wonderful serendipities to selling my knit and crochet on line.  That is custom orders.  They always challenge me.  One concern I often have is in using words to describe what a customer wants can cause confusion.  (i.e., they want a tree.  When I think tree, my mind envisions a Ponderosa pine tree.  Is that what your mind envisions?)  Most of my customers are not artists and so sending a simple drawing to show me what they have in mind is not an option.

A few months ago, I had a customer who was an artist.  She could define colors to the shade and sent simple drawings.  She also loved my rendition of columbines and she was wanting different versions of what I had in my shop with color variations from what was already there.  She loves dark columbines and she wanted barrettes using these colors. Here are the pictures of the barrettes she wanted.
She also wanted a set of traditional colored columbines.
 
 
Custom orders give me an idea of what others are looking for and so I often make more to add to my shop.  Here is what I am currently offering but color variations are an fairly simple request.  current supply of barrettes in my etsy shop
 
Besides this particular item, she also wanted columbines made into bookmarks and I came up with this design.


Finally she wanted a columbine necklace in various shades.  I added this particular variation to a columbine pattern that is available in my pattern stores because I love how it came out.
 
If you would like to make your own choker necklace in the colors of your choosing, the pattern for it can be found here.  columbine necklace pattern  The pattern includes picture tutorials that explain any stitches that might seem challenging.
 
It is amazing what ideas can spring from one customers order.  I am very grateful for custom orders.  I love making just what the customer had in mind and it sparks all sorts of ideas in my mind to do for future shoppers.


Tuesday, January 28, 2014

Valentines day lace knitting and crochet patterns

It is almost the end of January and still very cold in Kansas.  I love it.  We have a wonderful fireplace and I love to sit near it and design a new lace design. I adore lace knitting.   I am currently working on a purple lace knit scarf out of some home spun Moreno wool and angora bunny fur.  I love how it is coming out.  I will show pictures of the new design when I have it all blocked out. 

With Valentines coming up, I thought, why not showcase some lace knit and crochet designs that have roses and hearts as a theme.  I designed a warm wrap few year ago using Moreno and  angora bunny fur.  Any lace weight yarn will work with this pattern and I used size US 11 - 8.0 mm needles.  Hearts and Diamonds wrap is a simple design for anyone who has done lace knitting before.


Along the same theme I designed Pretty in hearts using Kid Seta yarn and size US 8 - 5.0mm needles.  It is a wonderful wrap that will take the chill out of summer evening and dress up an outfit with no sleeves.
 
The next wrap pattern, 2 hearts together, is just as light and airy using the same Kid Seta yarn and needles but uses nupps in the design.  This pattern is for the more experienced lace knitter.  I think either this pattern or Pretty in Hearts would make a wonderful wedding wrap for those strapless wedding dresses in a white lace yarn.
 
 
I also love to crochet and I love roses.  Unfortunately, I do not have a green thumb and have had a hard time getting roses to bloom outside my home.  So I designed a sun catcher using roses as a theme.  If the crystal prisms are added to the pattern as suggested then all winter long I have rainbows on my walls from the drop crystals.  I love the effect and it certainly brightens a winter home.
 
 
Finally, I created a thread crochet doily pattern that includes both hearts and rose buds.  I love how this pattern came out.


What is your favorite activity for this time of year?


Thursday, October 10, 2013

catching up and a Front Post dc and Back Post dc tutorial

It has been a very busy summer.  We went to see our granddaughter's 1st birthday which is 1600 miles away.  What a blast it was.  Then we went to the Colorado mountains to camp, which is always so inspiring for my work.  Something about going into wilderness areas that show God's amazing creations. There are so many birds, flowers and wildlife.  Here is a picture of of the area that we camped at.


After all the trips I thought I would do some picture tutorials on different ways to crochet.  Did you know you can crochet not just in the hole that is made by the stitch but also in the Front loop and back loop on top the crochet hole?   Front Loop and Back Loop work is done in the loops on the top of the crochet.  Every crochet stitch has two loops on top of the work weather it is sc, hdc, dc, tr, etc.
 
This particular stitch is great for adding a second layer or can be used to make a line design in the crochet such as the tail of my mermaid pattern.  By working in the front loop and back loop depending on the side being worked brings out the shell pattern.  These are common stitches that are used.


Today, I am doing a picture tutorial on how to make Front Post dc & Back Post dc since these stitches will be in the newest pattern I am designing. All my patterns include picture tutorials on unusual stitches so that any one can do them even if they don't know that particular stitch.

Again every crochet stitch has a post underneath the crochet hole that is usually worked.  The post is the main body of the stitch and is below the hole that is usually used.  In dc the post is rather long and easy to show so I will use it to for a picture tutorial.  Just know that even sc have post under the hole and this stitch can be done in them as well.

To make a front post dc (FPdc), instead of inserting the hook into the hole of the next stitch, insert the hook from the front, around the post of the stitch in the row below.  Bring it back out to the front of the work and make a double crochet stitch.


If starting the row with Front Post or Back Post work the turning ch should be a little shorter since the dc are actually worked in the row below and the resulting row will be a little shorter that a normal crochet row.
 
Back Post work is done by inserting the hook in the post below going from the back of the post, around the post and come out on the back side. 


Here is a picture of both the FPdc and BPdc worked alternately.  It produces a fantastic texture and can make a wonderful woven stitch pattern.
 

Here is a link to a Craftsy blog which uses this stitch to make a woven pattern. Crochet Basket weave Stitch  If you have not joined Craftsy.com, I would encourage you to join.  It is free and there is so much to learn.
 
I hope everyone else had as great a summer as I did.  What are some of your favorite stitches to crochet? 

Tuesday, August 20, 2013

A little boutonniere for a little groom

I love designing my different characters for wall hangings and bookmarks.  I make them out of thread crochet using a size 1 (2.25mm) hook.  This is a larger hook then is usually used for thread but I need that size to get the gauge I need. ( I am also hoping it will encourage yarn users to try thread.)

One of the challenges as a designer is to make everything on a very minature scale.  Since it is already done in thread the character is very "minaturized" already.  When I had finished this particular character which was a groom, one of my pattern testers suggested that he needed a little color and wouldn't it be wonderful if he had a boutonniere.  I agreed.  Now the challenge was to design a really tiny flower.

The color, of course was based on the bride's colors.  The smallest flower I had on the bride was on her headband, so I started with that.
I tried that on the groom's lapel and it was still too large.  After trying several different ideas, I just couldn't come up with anything that tiny.  So I went to a smaller hook.  I don't like switching hooks in mid-pattern but that was the only way to get it small enough to fit the groom.  So I added a new hook size to the pattern for this particular part.

I love my thread crochet pattern tester.   We communicate by e-mail as she lives in a different state.  Her name is Carol Henderson and she does an excellent job of finding mistakes and helping me come up with ideas.  She is an accomplished thread artist and she wanted to make a rose bud.

She came up with a rose bud design without changing hook sizes that I loved and sent me this wonderful picture tutorial to add to the pattern.
 Thank you Carol.  The pattern includes written instructions that follow these steps.
 
The steps start with a magic circle so that there is no hole to deal with.  The magic circle is a wonderful technique.  It starts with a slip knot that is not tightened until the end.  In fact the work is done in the circle that will become the knot.  Here is how it is done.
The start of a slip knot starts like this.  Do not tighten but grab a loop from the long end and bring it in through the circle.
Make a single crochet and start making your stitches into this circle.

When all the stitches are completed, the short end is pulled tight and now there is no opening.

I love how her rose bud came out and it is now, with her kind permission, part of the pattern.
 
This is just one of the many, many challenges that come with designing any knit or crochet pattern.  I am really thankful for my wonderful pattern testers who help make my patterns great.  Here is a picture of the groom with my flower and smaller hook but the pattern gives you either option in making the boutonniere.


This just proves that two heads are definately better than one.  I love how he came out.  What do you think?

Wednesday, August 7, 2013

Bride bookmark and Solomon's Knot tutorial

It has been a while but with vacations and some home repairs, I haven't been able to work on the computer much.  Luckily, it doesn't mean I haven't been designing.  I love knit or crochet because I can take with me.

I am currently designing a bride bookmark.  This is part of a commission wall hanging.  I love how she came out.
 
I decided to give her an overskirt on her dress of Solomon's knot or Love knot lace because of its fantastically lacey look.  So I thought I would do a picture tuturial of this particular stitch.
 
To start,  pull up a loop.  My pattern calls for a loop that is 1/4 inch long.  (Most patterns will tell you how long a loop is required for their pattern.)  
 
Yarn over and pull a loop through.
 
  Now comes the "tricky" part.  Sc in back strand of the long lp created by pulling a loop through above.
 
Below is a completed Solomon's knot or Love knot.


 Generally, a pattern has you make several on top of  each other as shown below. 
Future rows are generally worked in the sc stitch on top of the knot.  The stitch is not a hard one just a little confusing if you have not run into it before.
Here is a back view of the overskirt to show how neat this stitch works up.
I love how it came out. 
I think crochet and knitting are wonderful.  They are so mobile that they can be taken on 16 hour drives to see the children and the work isn't put on hold until we return.  What do you like about these arts?